

This year's work used materials that I've never used before and didn't use the hanging technique I've used for several years, so I had no idea what the outcome would be, but I'm happy that it was selected as one of the top 50!
Step 1: Ideas
Every year, I come up with a lot of ideas for designs and then consult with Advisor Katsuki to find a direction. This year, I consulted with Advisor Katsuki and he picked out the following: This year's theme is "The Beauty of Strata"

I thought it would be interesting to see the beautiful stripes and patterns created by the layers of different eras that nature has created over a long period of time, and the repetition of these patterns and the shifts in the layers that appear due to crustal movements.
I felt that the design would be hard to convey as an aquascape if it remained that way , so I brushed up the design.

The points that were improved are
1. Clarity - Be clear. Make your theme clear!
The motif of geological strata is attractive because of its variations, but if there are too many types, it becomes cluttered and it becomes difficult to convey the impression of layers.
To clarify the theme, I narrowed it down to the smallest unit of variation, two layers (two-tone color).
By narrowing it down to a two-tone color scheme, I think the differences between the layers are more prominent due to the contrast between light and dark.

When I'm thinking about a design, my image expands and I want to include various elements (which is the fun of planning), but at this stage I focused on narrowing it down and reluctantly cut out some elements
The act of eliminating elements to clarify the theme is often used as a phrase called "one visual, one message" when designing posters for university classes, as a way of making the theme easier to understand. I think this is a common point in aquascaping.
2. Strength - Add contrast and intensity!
The foreground, which is the main attraction, is large and clear, while the background is kept small. The front has a diagonal slit to increase tension

The sharp, diagonal shape is reminiscent of dangerous things such as horns and fangs, and I thought it would stimulate the human instinct to pay attention to dangerous things, or else it's dangerous!!
3. Repetition
By clarifying the rules and repeating them, I tried to make it easier to understand.

An image of two-tone black and white bands repeating from foreground to background.
Repetition has the advantage of making things easier to understand , but at the same time , it can also become monotonous. When incorporating repetition, I try to create variation within the rules of repetition.
Step 2: Materials
We will create the hardscape (framework) to reproduce the design , but first we need to select a material that will express the two-tone color of the strata, which is the main focus of this project .

Although the layers are all deposits of the same earth, two different expressions of light and dark are required .

I thought it would be interesting to combine completely different materials, but I thought that although it would create an impact, it would lose the sense of unity, so this time I decided to think of a combination that is similar but different, something that resonates even though it is made of different materials.
I searched for new materials at various aquarium shops, gardening stores, home improvement stores, stone shops, the Internet, etc., but I couldn't find anything that really caught my eye, and I was worried... when I found some materials I had in stock at home, sitting on my balcony.

Discover something that might be useful. Used in an old piece

Petrified wood and I always use it - Driftwood

I thought that this would solve the problem of the two different combinations of things that have the same origin, "trees," with a difference of 100 million years between ancient and modern times, resonating with each other (the expression of two different types of strata).
I was a bit worried about whether they would match when I put them together, but the result was...

This looks good (This is the resonance of different things! )
I desperately searched for materials for this year's project, but the answer was on my balcony...
Now that we have confirmed the compatibility, we will proceed with this combination.

Small pieces of driftwood are also prepared for detailed modeling.

Bleaching with bleach
It looked like a beautiful white, but this bleached driftwood caused some trouble later on...
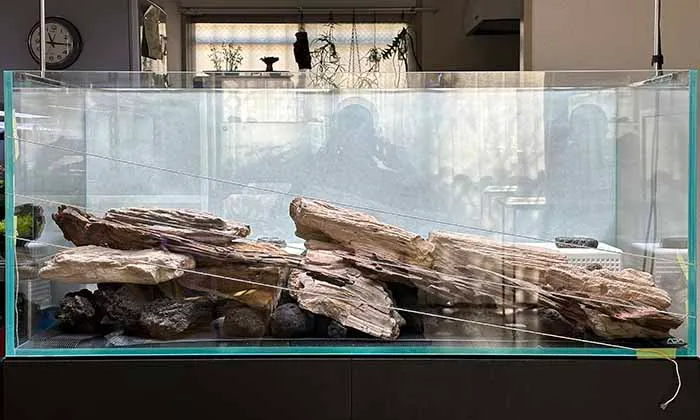
Step 3: Hardscape
First, the layout

Building the foundation
A pot bottom net is placed on the bottom of the tank to prevent damage, and a plastic box (with holes drilled in it with an impact driver) purchased at a 100 yen store is placed on the back of the tank to conserve soil and increase water permeability at the bottom .

The illustration shows the process of creating the layout base (front view).
The lava rocks and cotton are useful for fixing plastic boxes, providing a space for bacteria to settle, saving soil, and as mulch. View from above

It looks like this. The front of the tank has a guideline planned with a design.

Made with hemp string and masking tape
Keeping the guide in mind

Place lava rocks and driftwood
In line with the guidelines

The shape is created by combining multiple driftwood pieces.
Trying out various patterns

I'm trying to find the best combination While doing it
At times like this, it's good to leave the tank and refresh your mind.
When dealing with natural materials, things often don't go exactly as planned , so rather than recreating the design, I proceeded with the idea of leaving it up to the shape of the material.

The tip of the fault, which is the highlight of the site , is carefully crafted by combining bleached driftwood pieces with fossil wood as the base .

Kamihata liquid adhesive and auxiliary agents are used to attach driftwood and stones. Check the balance periodically

Paying attention to detail and ensuring overall balance. I got hooked, and after a few days I had muscle pain.
As you repeat this process, We are getting closer to the design image.

The Importance of Hardscapes
I believe that hardscape is an important element that forms the basis of an aquarium work. When I create an aquarium, I pay attention not only to visual beauty, but also to the following points:
Proper Water Filtration
Ensuring sufficient light for aquatic plants
Ease of maintenance
Maintaining a healthy ecosystem
We aim to create a well-balanced hardscape while always keeping these elements in mind.
Once the main structure is complete, fill in the gaps with small lava stones .

Then fix it with underwater putty (the white gum-like thing between the lava stones is underwater putty).
How to use underwater putty
This underwater putty is a material that we use every year to fix stones in the invisible parts of the hardscape. This putty is specially designed for underwater use, so it is highly water resistant and adheres so firmly that it is difficult to remove when resetting. Be careful, as the high adhesive power can leave behind putty marks
Fill the gaps with cotton. Once stuffed and firmly secured

Procedure for adding soil
From here, we will start adding soil, but don't add it all at once. Check the hardscape for any areas where the soil may leak, and if there are any leaks, plug the holes with cotton and proceed carefully.
The soil used this time is GEX Aquatic Plant No. 1 Sand The aquatic plants grow well and it is available online or at retail stores anytime.
On top of the plastic case, I piled up bags of pumice for gardening to raise the soil level (to save soil) and encourage bacteria to take hold.

Let's lay out the middle ground.
I want to maintain the unity of the piece, so I draw the middle ground as well as the foreground.

Be mindful of the two-tone combination of driftwood (dark) and fossil wood (light) (follow the rules)
I want to express depth, so I want to maintain continuity from the foreground.

The lines will be thinner than those in the foreground, and the layout will make the effect weaker as it goes further back.
Similarly, we will add soil to the background and lay it out. If you try to recreate a steep slope using only soil. The soil will start to crumble, but
the driftwood and fossil wood placed in the background act as a dam to maintain this angle.

Keep distance from the tank I'll check the overall impression.

Details

The texture of the left foreground was flat and uninteresting.
I used it to finely design the foreground highlights to enhance the texture details without compromising the overall impression.

A small piece of bleached driftwood
Petrified wood
I glued small pieces of driftwood together. This was a really hard job, but I realized that attention to detail can make a big difference in the overall impression.

Diagonal angle

Finally, lay soil on the bottom.
Hardscape Finishes


Step 4: Planting
We recommend starting with a mist system, which is easy to manage initially.
First, I planted new large pearl grass all over the place to create a base for the work.

The purpose of this is to stabilize the steep ground and reduce the risk of slope collapse , as well as to have a base coat effect.

Underpainting is a term used in the world of Western painting, and it refers to the process of applying a thin layer of color to the canvas before starting to paint an oil painting.

Applying a base color helps to set the tone of the entire piece.
In aquariums, I feel that the New Large Pearl Glass stabilizes the slope and sets the tone of the entire piece, and also serves as a green background, making elements such as rocks and driftwood stand out.
The joy of rebirth
The tank one month after mist treatment

I think the base coat is progressing smoothly (the aquatic plants are developing) and the impression of the rocks and driftwood is becoming clearer.
The old leaves begin to wither and melt.

The new leaves that have developed in this environment are starting to stand out.
To adapt to the new environment, it discards old leaves, regenerates new ones, and spreads by creeping.

When I see the strength of plants, I feel energized.
Looking at the tank from the side

You can see that it is firmly rooted.
Root growth is a sign that the aquatic plants are growing healthily and that a natural ecosystem is forming, so it's reassuring to see this.
Trouble occurs
The aquatic plants have been growing well. Looking at the material, I noticed that small pieces of driftwood that had been bleached
during the mist treatment had turned brown .

When it was first bleached it was a beautiful white color, but it seems that only the surface of the driftwood was bleached, and during the mist treatment the surface decomposed and it returned to its original color .
If we leave it like this, it will no longer be a two-tone color with light and dark.
It was a place that took a lot of time to create, but to solve the problem, we removed the area where it was created (the driftwood pieces) and decided to look for a solution .
Recreating driftwood with frottage
The solution I came up with was to try to recreate the driftwood pieces using oven clay .

I have used it before as a base for aquatic mosses such as willow moss, and since the fired clay did not affect the water quality (I did not check the water quality in detail), I decided to use it again this time.
The frottage technique involves placing paper on a textured surface.

The method is to rub a pencil or crayon over the surface to copy the pattern and texture. I thought that this method would make it easy to reproduce realistic textures without any special skills .
A nice driftwood

Squeezing tightly

Pressing the clay
If you turn it over, it looks like this. The negative and positive are reversed, but doesn't it have a natural texture ?

It would be difficult (impossible) to recreate this by hand, but with the frottage technique the transfer can be completed in an instant!
It's fine as is, but to add more definition, I used a spatula

Emphasis on the chin-chin! It was a bit too linear to create a natural look. (I think that if the lines were more gradual or more wobbly, it would be closer to the original texture of driftwood.)
If the color and shape are uniform, it will look artificial, so I use three colors of clay (off-white, light brown, and dark brown) and create a large number of patterns ranging from small to large and short to long.

Bake this in the oven. It looks delicious in the photo

The room is filled with a strong burnt smell (ventilation is essential)
The clay and driftwood are placed and fired.

The clay driftwood is then attached to the driftwood again.
The human eye has the tendency to focus on larger objects first and then move on to smaller objects.

While keeping in mind the flow of the eye, lay out the larger parts on the outside and the smaller parts towards the tip.
Placed in areas other than where the problem occurred

To make sure the clay driftwood doesn't stand out too much , I adjusted it while making use of the surfaces of the driftwood and fossil wood that I placed first. I stared at the tank closely, paying close attention to the details, and pulled back to check the overall balance.

Second hardscape completed!
Fun after filling On the completed hardscape

Water injection
I also like the oxygen bubbles that come out of the leaves above water when water is poured in .

The dynamic release of oxygen , which can only be seen when water is poured in, is one of the joys of aquascaping.
Planting aquatic plants
In parallel with the development of New Large Pearl Grass into underwater leaves, stem plants in the background and ferns in the foreground are planted.
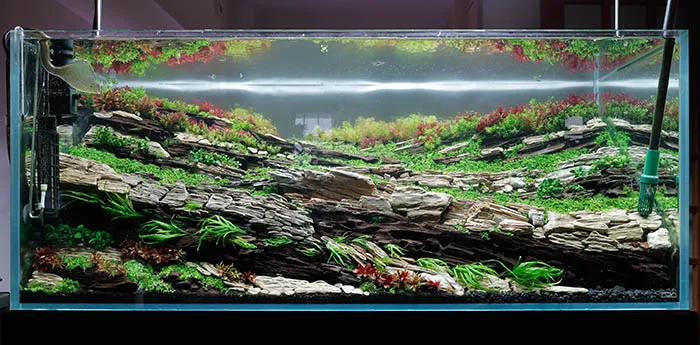
Here is the aquatic plant I used:
Undergrowth
Large Pearl Grass
Foreground and middle ground
Microsorum trident
Anubias nanaputi
Ludwigia repens rubin
Background
Short Hairgrass
Pearl Grass
Green Rotala
Rotala indica
Rotala rotundifolia Reddish
Orange Myriophyllum
Myriophyllum mattogrossense
Troubleshooting
And here we encountered another problem: the tip of the fault line, which is the highlight of this work. The color of the bleached driftwood piece attached to the fossil wood at this tip also reverted to the original color of the driftwood, so we had to think of a solution for this too.

This time, water has already been poured in, so in order to attach the driftwood , it is necessary to drain the water and dry the fossilized wood. However, this will put a strain on the aquatic plants and living creatures. Therefore, we needed an idea that could be used underwater.
So I came up with an idea to use oven clay again this time. Using the frottage technique, I tried to create a cover-shaped clay driftwood that can be hooked onto a wood fossil.

I made several patterns and chose the one that felt the most comfortable. Put it on with a snap

Replacement completed!
Finishing work. After that, while keeping the final image in mind,

I trimmed it, put it back, and finished it.
Fish introduced Nanostoms Beckholdi. They have a gentle personality and are easy to raise.

I've been using them for the past few years because of their slender shape and the beauty they show when swimming in groups.
Shooting
Prepare to take photos when the aquatic plants are in good condition

There were a lot of problems, too.
Step 5: Final
Production Process
This year's project was planned around the theme of the beauty of geological strata . I thought it would be interesting to see the beautiful stripes and patterns created by the layers of different eras that nature has created over a long period of time, and the repetition of these patterns and the shifts in the layers that appear due to crustal movements.

In addition, the gaps and steps in the rocks created by the fault would provide ideal hiding places for fish and an ideal environment for plant growth.
However, I felt that it would be difficult to convey the concept if I left it as it was.

I improved the design of my waterscape in three ways :
1) Clarity : The theme of the strata is narrowed down to a two-layer structure (two-tone color) to make the expression clear.
2) Strength : By making the oblique fault on the front larger and sharper, the contrast with the background is emphasized.
3) Repetition : Repeating two-tone colors from foreground to background creates a sense of visual unity.
In hardscape production, we combine driftwood and fossil wood, two similar yet different materials, to express the two-tone color of the strata.

We took on the challenge of achieving both unity and contrast.
After planting, there was a problem with the bleached driftwood returning to its original color, but this problem became the trigger for

I was able to discover hints for new ways of expression that combine fired clay and frottage techniques
This year, I started growing aquatic plants early.

I think the stem plants have grown densely and beautifully. That was one of the initial challenges.

I think the finishing touches and photography that make use of the reflective surfaces on the sides and top also turned out well.
Challenges for next time
The challenge I feel is that my observational and expressive abilities in expressing the strata are still immature. As a result, the marks made during production (manual traces) stand out more than necessary, and I feel that the impression of artificial construction is stronger than the original intention of expressing the beauty of nature. This is an unavoidable characteristic of my style of exploring new production methods, but next time I will continue to take on new challenges while aiming to create an aquascape where the original beauty of nature can be felt throughout the work.
Author
Kazuma Takeuchi / Japan


Leave your comments